

0
Owner's of the Tripp Lite Switch NETDIRECTOR gave it a score of 0 out of 5. Here's how the scores stacked up:

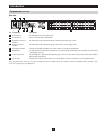
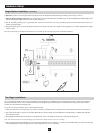
Use the M3x8 Phillips head hex screws
provided with the rack mount kit
Use user supplied
hardware to attach
to the rack
9
Hardware Setup
Rack Mounting Safety Instructions
• Beforeworkingontherack,makesurethatthestabilizersaresecuredtotherack,extendedtotheoor,andthatthefullweightoftherack
rests on the floor. Install front and side stabilizers on a single rack or front stabilizers for joined multiple racks before working on the rack.
• Alwaysloadtherackfromthebottomup,andloadtheheaviestitemintherackrst.
• Makesurethattherackislevelandstablebeforeextendingadevicefromtherack.
• Usecautionwhenpressingthedevicerailreleaselatchesandslidingadeviceintooroutofarack;thesliderailscanpinchyourngers.
• Afteradeviceisinsertedintotherack,carefullyextendtherailintoalockingposition,andthenslidethedeviceintotherack.
• DonotoverloadtheACsupplybranchcircuitthatprovidespowertotherack.Thetotalrackloadshouldnotexceed80percentofthebranch
circuit rating.
• Makesurethatallequipmentusedontherack,includingpowerstripsandotherelectricalconnectors,isproperlygrounded.
• Ensurethatproperairowisprovidedtodevicesintherack.
• Ensurethattheoperatingambienttemperatureoftherackenvironmentdoesnotexceedthemaximumambienttemperaturespeciedforthe
equipment by the manufacturer
• Donotsteponorstandonanydevicewhenservicingotherdevicesinarack.
The KVM switch can be placed on any appropriate level surface that can safely support its weight plus the weight of its attached cables. When
placing the KVM switch on a desktop, remove the backing material from the rubber feet that came with this package and stick them onto the
switch’s bottom panel at the corners.
Note: To ensure adequate ventilation, allow at least 5 cm on each side, and 13 cm at the back for power cord and cable clearance.
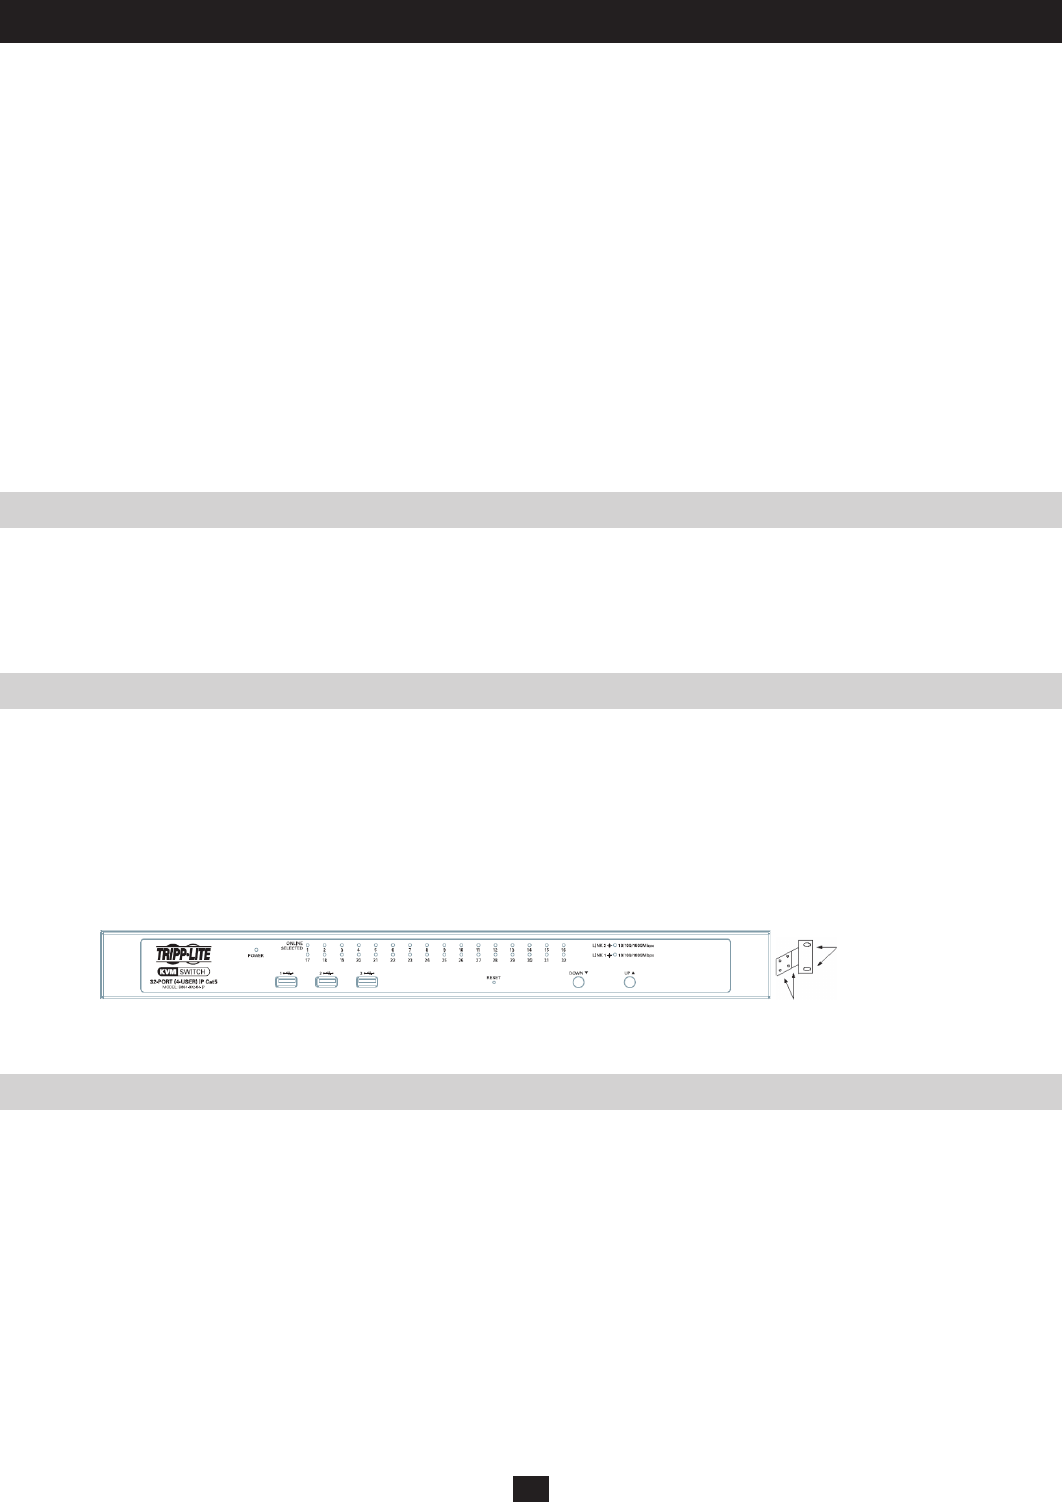
The KVM switch can be mounted in a 19 in (1U) rack. The mounting brackets can screw into either the front or the back of the unit so that it can
attach to the front or back of the rack.
1. Depending on whether you will be front rack mounting or rear rack mounting the unit, remove the two screws located on both sides of the front
or back of the unit.
2. Use the screws supplied with the rack mount kit to screw the rack mounting brackets into the front or rear of the unit.
3. Position the device in the front or rear of the rack and align the holes in the mounting brackets with the holes in the rack.
4. Secure the rack mount brackets to the rack using user supplied screws.
In a Single Stage installation, there are no additional KVM switches cascaded and/or daisy-chained from the B064-Series KVM. To set up a
single stage installation, refer to the following instructions and the corresponding installation diagrams starting on page 10.
1. Make sure that power to all the devices you will be connecting, including all pre-existing devices on the installation, have been turned off.
2. Optional: Plug your Local Console’s keyboard, monitor, and mouse into the KVM’s Local Console Ports. You will need to connect the
included USB – PS/2 Console Cable Kit to the console port on the back of the unit.
Note: You can use any combination of keyboard and mouse connections. For example, you can use a PS/2 keyboard with a USB mouse. USB
keyboards and mice can plug into the USB ports on the front panel, as well as the ports on the USB – PS/2 Console Cable Kit. The B064-Series
KVM Switch does not support distances above 65 ft between the KVM and the local monitor.
3. Use Cat5e cable to connect any available KVM port to a B054-001-PS2 (for PS/2 Servers) or B054-001-USB (for USB Servers) Server
Interface Unit.
Note: The distance between the B064-Series KVM and the Server Interface Unit must not exceed 130 ft.
4. Connect the Server Interface Unit to the computer/server.
5. Connect a Cat5e cable from the network into the KVM switch’s primary network port (LAN 1).
Stacking
Rack Mounting
Single Station Installation


Find Your Products By Category
- Home Audio
- Computer Equipment
- Photography
- TV and Video
- Household Appliance
- Communications
- Car Audio and Video
- Automotive
- Cell Phone
- Portable Media
- Kitchen Appliance
- Fitness & Sports
- Lawn and Garden
- Musical Instruments & Equipment
- Power Tools
- Personal Care
- Marine Equipment
- Video Game
- Baby
- Laundry Appliance
- Outdoor Cooking
Please Login
